
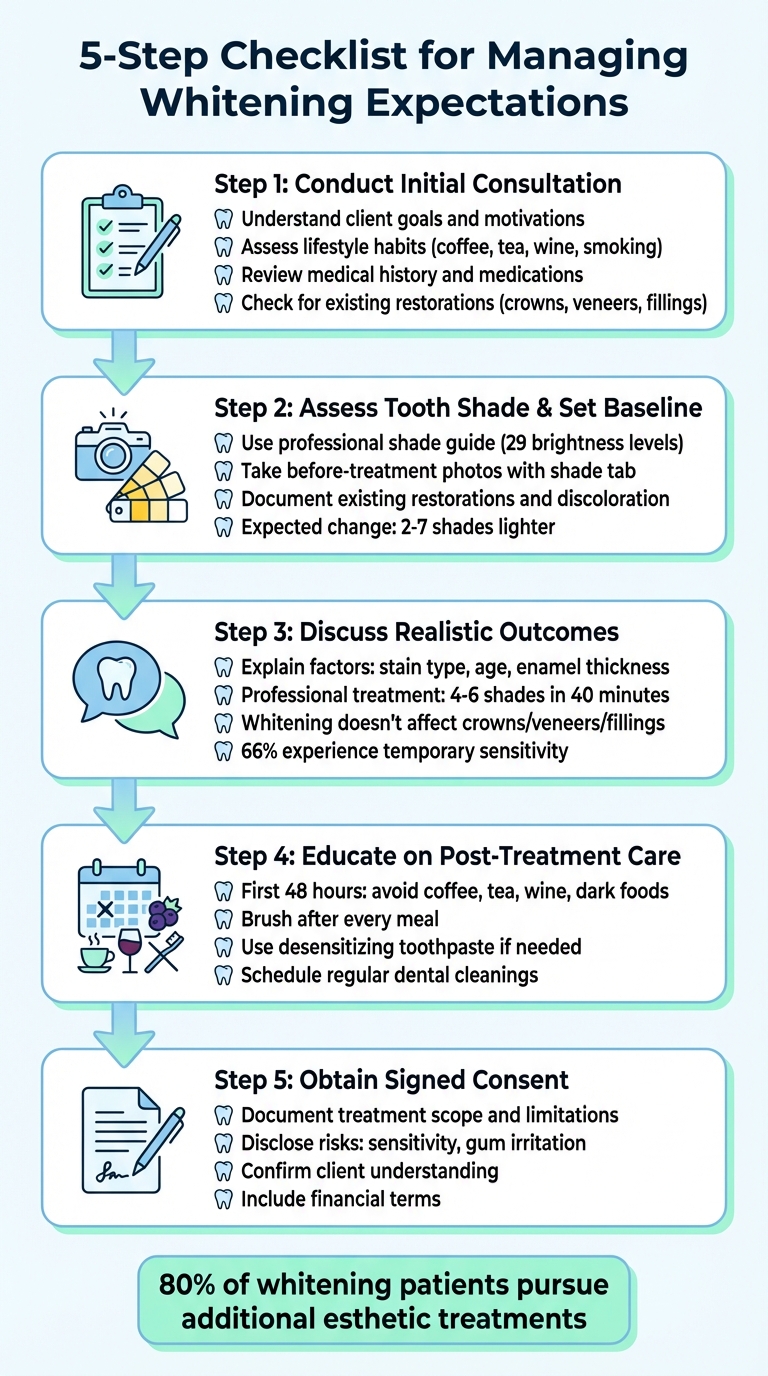
Checklist For Managing Whitening Expectations
Teeth whitening is a popular cosmetic treatment, but managing client expectations is critical to avoid disappointment and protect your professional reputation. Unrealistic goals, like achieving a "perfect white" shade or expecting uniform results on all teeth, are common issues. Here's what you need to know:
- Initial Consultation: Understand client goals, assess lifestyle habits, medical history, and existing restorations. This sets the foundation for realistic expectations.
- Whitening Process: Explain how whitening works, its limitations (e.g., it doesn’t affect crowns or veneers), and potential side effects like sensitivity or gum irritation.
- Baseline Assessment: Use a shade guide and take photos to document the starting point, helping clients see progress clearly.
- Realistic Outcomes: Discuss factors like stain types, age, and enamel thickness that can influence results. Address myths about "Hollywood white" teeth and clarify the need for touch-ups.
- Post-Treatment Care: Provide dietary recommendations (e.g., avoid staining foods for 48 hours) and emphasize good oral hygiene to maintain results.
- Consent and Confirmation: Use consent forms to ensure clients understand the procedure, risks, and aftercare requirements.
5-Step Checklist for Managing Teeth Whitening Client Expectations
Troubleshooting Teeth Whitening | Solving Common Problems & Improving Outcomes
sbb-itb-accb75b
Step 1: Conduct the Initial Consultation
The initial consultation is crucial for setting the stage and managing expectations. This is your chance to understand your client’s goals and ensure they align with what teeth whitening can realistically achieve. Skipping this step could lead to unmet expectations, especially if the client has an unrealistic timeline or shade in mind.
Gather Client Information
Start by exploring why they’re seeking whitening now. Asking, "What made you consider whitening at this time?" can uncover emotional motivations, like an upcoming wedding or job interview, that might influence their expectations. Understanding this helps you gauge how invested they are in the results.
Next, dig into their specific goals by asking, "What are your hopes for your smile?". After posing this question, pause to let them fully express their thoughts. Often, this reveals a broader "wish list" that may go beyond just whiter teeth.
It’s also essential to assess their lifestyle habits. Ask about smoking, or their consumption of coffee, tea, or red wine. These habits contribute to extrinsic stains, which are easier to address but can quickly return if the client doesn’t make changes during treatment.
Review their clinical history. Ask about tooth sensitivity, allergies to peroxide or plastic, and medications like tetracycline or minocycline, which can cause deep, stubborn stains. For clients with tetracycline staining, set realistic expectations. As Louise Sinclair explains:
Your stains are due to tetracycline. I want to explain that this type of stain is more difficult to remove... It may take several weeks... or in really difficult cases even months.
Finally, inquire about any existing restorations. Ask, "Are you happy with your existing tooth-coloured restorations?". Crowns, veneers, and composite fillings won’t whiten during treatment, which could leave them mismatched with the newly whitened teeth. Clients may need to replace these restorations afterward to maintain a consistent appearance.
Use the insights from this conversation to guide the client through the next steps of the whitening process.
Explain the Whitening Process
Once you’ve gathered all the necessary information, explain the treatment process in detail. Professional in-office whitening treatments can lighten teeth by four to six shades in a single 40-minute session. However, timelines can vary depending on the type and severity of the stains.
Be transparent about potential side effects. Up to two-thirds of clients experience mild to moderate tooth sensitivity during the early stages of treatment. Gingival irritation can also occur if trays don’t fit properly or if the gel is misapplied, but these issues are temporary and typically resolve soon after treatment. Discussing this upfront helps prevent unnecessary worry if symptoms arise.
It’s also important to clarify that whitening agents only work on natural teeth. As the American Dental Association explains:
Patients who have tooth-coloured restorations (including crowns or implants) should be aware that only natural teeth will be affected by the bleaching agent.
Encourage clients to schedule a professional dental cleaning one to two weeks before whitening. This step removes plaque and tartar, ensuring the whitening agent penetrates the enamel evenly. It’s also an opportunity to address any active decay or gingivitis, as whitening agents can cause severe pain if they come into contact with untreated cavities.
Step 2: Assess Tooth Shade and Set a Baseline
Setting a baseline is essential for tracking progress and demonstrating results. Without it, clients might forget their original tooth shade and question the effectiveness of the treatment. Louise Sinclair from Colgate Professional highlights this importance:
Taking the pre-whitening shade at the beginning of treatment and referring back to that can also help patients realize that their teeth really are several shades whiter... Otherwise, patients may not remember what shade they had, leading to the perception that not much changed.
This step ensures both you and your client have a clear reference point, helping to manage expectations and avoid misunderstandings.
Use a Shade Guide
A professional shade guide provides an objective way to compare the client's current tooth colour. The VITA Bleachedguide 3D-MASTER, endorsed by the American Dental Association, is a popular option. It offers 29 distinct brightness levels, capturing even subtle differences in tooth shade. As VITA Zahnfabrik explains:
These "29 defined brightness levels make it possible to accurately capture even the finest brightness nuances and make them visible to the patient".
For accuracy, have the client hold a mirror while you match their teeth to the shade guide. This ensures both of you agree on the starting point. Even a small change of two or three shades can make a striking difference in a smile's appearance. Since most clients experience a shift of two to seven shades after professional whitening equipment, documenting the baseline is key to showcasing the results.
Take Before-Treatment Photos
Photographs are another critical tool for documenting the starting point. Take a picture of the client's teeth alongside the corresponding shade guide tab. This visual record not only reinforces the shade assessment but also helps manage expectations. Dentist Linda Greenwall emphasizes this practice:
Patients often forget how dark or discoloured the teeth were before commencing treatment and may be dissatisfied if they do not notice further shade changes. It helps to photograph the teeth with the baseline porcelain shade tab so that the patients can appreciate the degree of colour change.
For consistency, use the same lighting and background for all photos. Be sure to capture any existing restorations, white spots, or translucent edges, as these features won’t respond to whitening and may become more noticeable. This thorough documentation protects against disputes and highlights the treatment's effectiveness.
Step 3: Discuss Realistic Outcomes and Limitations
After setting a baseline, it’s essential to have an open and honest discussion about what the treatment can realistically achieve. This step helps manage expectations and avoids disappointment. As Louise Sinclair explains, “While whitening products remove intrinsic stain, they don’t alter the underlying natural tooth colour”. This distinction is key to fostering clear communication.
Explain Factors That Influence Results
Teeth whitening isn’t a one-size-fits-all process. Several factors influence the results, with the type of staining being the most significant. Surface stains caused by coffee, tea, or tobacco are typically easier to lighten than internal discolouration stemming from aging or medications. For example, yellowish tones generally respond well to bleaching agents, while deeper stains, such as those from tetracycline, may require more intensive or prolonged treatment, like extended nightly applications. If a client has these deeper stains, it’s important to explain the longer timeline or suggest alternatives like veneers.
Age can also play a role in whitening outcomes. As enamel naturally thins over time, the yellowish dentin underneath becomes more visible, which can limit how bright teeth appear, even after treatment. Additionally, areas with thicker enamel, like the sides and biting edges, respond faster than thinner enamel areas. Explaining these nuances helps clients understand why whitening results may not be uniform across all teeth.
Important Reminder: Existing restorations, such as crowns or fillings, will not change colour during whitening. The American Dental Association highlights that “patient expectations may not be met or may be unrealistic without addressing cosmetic issues with existing restorations”. Be sure to document all restorations during the assessment and inform clients that they may need to replace restorations post-whitening to achieve a consistent look.
Address Common Myths
To further set realistic expectations, it’s helpful to debunk common myths about teeth whitening. This builds on the earlier consultation discussions about treatment limitations.
Many clients assume they can achieve a “Hollywood white” smile, but natural teeth typically range from light greyish to yellow shades - they aren’t naturally pure white. While professional treatments can brighten teeth by up to eight shades in a single session, the final results depend on the starting condition of the teeth and biological factors. Use a shade guide to illustrate a realistic target, a few shades lighter than their baseline, rather than setting unattainable goals.
Another misconception is that whitening works on all dental materials. As mentioned earlier, bleaching agents only affect natural tooth enamel. College Street Dentistry emphasizes, “Existing dental work requires special consideration... crowns, veneers, and fillings don’t respond to teeth whitening agents like natural teeth”. It’s often best to complete whitening before getting new restorations so the dental work can be matched to the newly whitened teeth.
Lastly, address concerns about sensitivity. Up to two-thirds of users experience temporary tooth sensitivity during the early stages of bleaching. Reassure clients that this is a normal side effect and offer strategies to ease discomfort, such as using desensitizing toothpaste or spacing out treatments to reduce irritation. Providing these solutions can help clients feel more confident and prepared for the process.
Step 4: Educate Clients on Post-Treatment Care
Proper post-treatment care is key to maintaining whitening results, and clear instructions can help clients avoid common pitfalls like staining and poor oral hygiene. This step builds on earlier discussions about realistic expectations and ensures clients are equipped to protect their brightened smile.
Provide Dietary Recommendations
The first 48 hours after a whitening treatment are critical. During this time, teeth are more porous and prone to absorbing pigments from foods and drinks. To prevent staining, recommend avoiding items like:
- Coffee, tea, and red wine
- Cola and other dark sodas
- Berries, soy sauce, ketchup, tomato sauce, and curries
- Coloured mouthwashes and tobacco
Encourage clients to use a straw for beverages like coffee and to rinse their mouth immediately after consuming anything that could stain. Additionally, they should avoid extremely hot or cold foods to reduce the risk of sensitivity.
After the initial 48 hours, clients can make dietary choices that naturally support their whitening efforts. Crunchy fruits and vegetables, such as apples and carrots, not only help clean the teeth but also stimulate saliva production, which can aid in maintaining brightness. As Louise Sinclair aptly points out:
Whitening is not a permanent solution, and gradual relapse does occur.
By setting realistic expectations, you can help clients understand that periodic touch-ups may be needed to maintain their results.
Review Oral Hygiene Practices
In addition to dietary adjustments, maintaining excellent oral hygiene is essential for prolonging the effects of whitening treatments. Reinforce the importance of daily habits that prevent stains and address sensitivity.
Encourage clients to brush after every meal to minimise plaque buildup and surface stains. Recommend products specifically designed to support whitening and sensitivity management, such as Sensodyne Rapid Relief for sensitivity and whitening toothpastes like Colgate Optic White Renewal or Crest 3D White. These products are effective at lifting surface stains without damaging enamel.
For brushing, a soft-bristled toothbrush is ideal to avoid irritating freshly whitened teeth. Water flossers can be helpful in cleaning between teeth without causing discomfort. If sensitivity becomes an ongoing issue, suggest switching to desensitizing toothpaste. Finally, regular dental cleanings are a must to remove any residual stains and maintain oral health.
Step 5: Obtain Signed Consent and Confirmation
Finalizing the consent process is a key step in setting clear expectations. A signed consent form serves as proof that the client understands the procedure, its risks, and the necessary aftercare. This informed consent protects both you and your client by ensuring all treatment risks are clearly communicated. Let’s break down the essential elements of this process.
Use Consent Forms and Waivers
A well-prepared consent form should include the following details: client and provider information, the scope of the treatment, expected outcomes and limitations, disclosure of risks, and financial terms.
When documenting the clinical facts, make sure to outline the expected results - such as teeth becoming one to two shades lighter on a dental shade guide. Be transparent about the limitations, like how whitening only affects natural teeth and won’t lighten crowns, veneers, or composite fillings.
Risk disclosure is critical. Clearly list common side effects, such as tooth sensitivity, gum irritation, and potential allergic reactions to whitening agents. It’s also important to address stain variability, explaining that yellow or brown stains typically respond better to treatment than grey or blue stains. Additionally, note that certain conditions, like tetracycline staining, may show minimal improvement. Financial terms should be detailed, including the total cost and payment schedule.
To ensure clients fully understand, include an acknowledgment section for them to initial, confirming they are aware of the treatment’s limitations. For instance, Smile360 Teeth Whitening Canada offers a Teeth Whitening Waiver Agreement Template for $9.95 CAD, which can simplify the process.
Confirm Client Understanding of Expectations
Once the form is completed, take time to confirm that the client fully understands the procedure and its limitations before they sign. Ask questions like, “Can you explain the expected results?” or “What steps will you take if you experience sensitivity after the treatment?”
If the client seems unsure or struggles to articulate their understanding, don’t rush. Take the opportunity to clarify any points of confusion. You can also provide written materials for them to review at home or schedule a follow-up conversation if necessary. Spending this extra time now helps avoid misunderstandings and potential issues down the line.
Conclusion
This checklist is designed to help you deliver top-notch teeth whitening services. By conducting thorough consultations, documenting baselines with shade guides and photos, and setting realistic expectations, you create a strong foundation for satisfied clients. As Linda Greenwall aptly puts it, "Planning is essential for whitening treatment because tooth whitening is normally the beginning of the esthetic journey".
Interestingly, research highlights that around 80% of patients who undergo teeth whitening go on to explore additional esthetic or restorative dental treatments. This shows that managing expectations effectively not only leaves clients happy but also builds lasting relationships and opens opportunities for other services. Clear documentation - such as before-and-after photos and explanations about how whitening doesn’t affect crowns or veneers - further prepares clients for realistic results.
Taking the time to explain the whitening process, address concerns about sensitivity, and outline post-treatment care fosters trust and increases treatment acceptance. This focus on communication reduces complaints, ensures better adherence to aftercare instructions, and leads to clients who are thrilled with their brighter smiles.
Consistency is key in every step of this process. From collecting medical histories to obtaining signed consent forms, each action ensures a high standard of care for every client. Following this approach not only minimizes errors but also reinforces your professionalism and integrity in teeth whitening treatments.
FAQs
How can I help clients set realistic expectations for teeth whitening results?
Helping clients understand what to expect from teeth whitening is essential for their satisfaction. Start with a thorough oral examination to ensure teeth and gums are healthy, remove any plaque or tartar, and document the current shade of their teeth. This creates a clear starting point. Then, have an open discussion about their goals, emphasizing that results can vary depending on factors like age, genetics, and the severity of stains. It's important to explain that teeth typically lighten by a few shades but won’t achieve a "snow-white" appearance.
Make sure to clarify that only natural teeth can be whitened - restorations such as crowns or veneers will not change colour. Walk clients through the treatment process, covering the number of sessions needed, the gradual improvements they can expect over the following days, and the importance of maintenance to prolong results.
For clients concerned about sensitivity, suggest using desensitising toothpaste and avoiding foods and drinks that could stain their teeth for the first 24–48 hours after treatment. Providing a written consent form and detailed after-care instructions not only ensures transparency but also helps clients feel informed and ready for the process.
What can I do if my teeth feel sensitive after whitening?
It's common to feel a bit of sensitivity for 24–48 hours after a whitening treatment. To keep discomfort in check and safeguard your teeth, here are a few helpful tips:
- Steer clear of extreme temperatures: Avoid very hot, cold, or acidic foods and drinks for a couple of days.
- Switch to a desensitising toothpaste: Apply it to your teeth and let it sit for a moment before rinsing. This can help calm sensitivity.
- Try a warm saltwater rinse: It’s a simple way to soothe irritated gums.
- Consider over-the-counter pain relief: If needed, medications like ibuprofen or acetaminophen can help. Just follow the recommended dosage.
If the sensitivity sticks around longer than 48–72 hours or starts to feel worse, it’s a good idea to reach out to your dentist. They can check for any potential issues and provide further guidance. Taking these steps can help you enjoy your brighter smile with ease!
Why doesn’t my dental work match my teeth after whitening?
Dental treatments like crowns, veneers, and fillings don’t react to whitening treatments. Why? Unlike natural teeth, these materials aren’t porous, so they won’t lighten during the whitening process. This can sometimes lead to a mismatch, as your natural teeth brighten while the dental work stays the same shade.
It’s crucial to address this with clients before starting any whitening procedure. By setting clear expectations and discussing options - like replacing older dental work to better match the new tooth shade - you can help ensure a more even, polished result.