

Laser-Assisted Tooth Whitening: What To Expect
Most laser-assisted tooth whitening visits take about 1 to 2 hours, with whitening cycles often running 12 to 20 minutes each. If I’m adding this service, I need a clear flow: check if the client is suited for treatment, record the starting shade, protect soft tissue, apply gel, run short light cycles, and give written aftercare for the first 24 to 48 hours.
Here’s the short version:
- Start with screening: I review goals, oral health history, sensitivity, gum irritation, and dental work like crowns or veneers.
- Record a baseline shade: This gives me a before-and-after point of reference.
- Set up the mouth well: I isolate lips, cheeks, and gums using silicone cheek retractors, dry the teeth, and apply gel only to enamel.
- Use short timed cycles: I check comfort between cycles and stop if sensitivity builds.
- Finish with aftercare: Clients should avoid staining foods and drinks, plus smoking or vaping, for 48 hours.
- Plan the next step: A follow-up helps me check comfort, shade retention, and timing for touch-ups.
One point matters throughout: I need to work within federal, provincial, and municipal rules, and make sure my equipment, products, and coverage line up with local requirements.
If I want a simple way to view the appointment, I can think of it as screen, prep, whiten, review, and follow up.
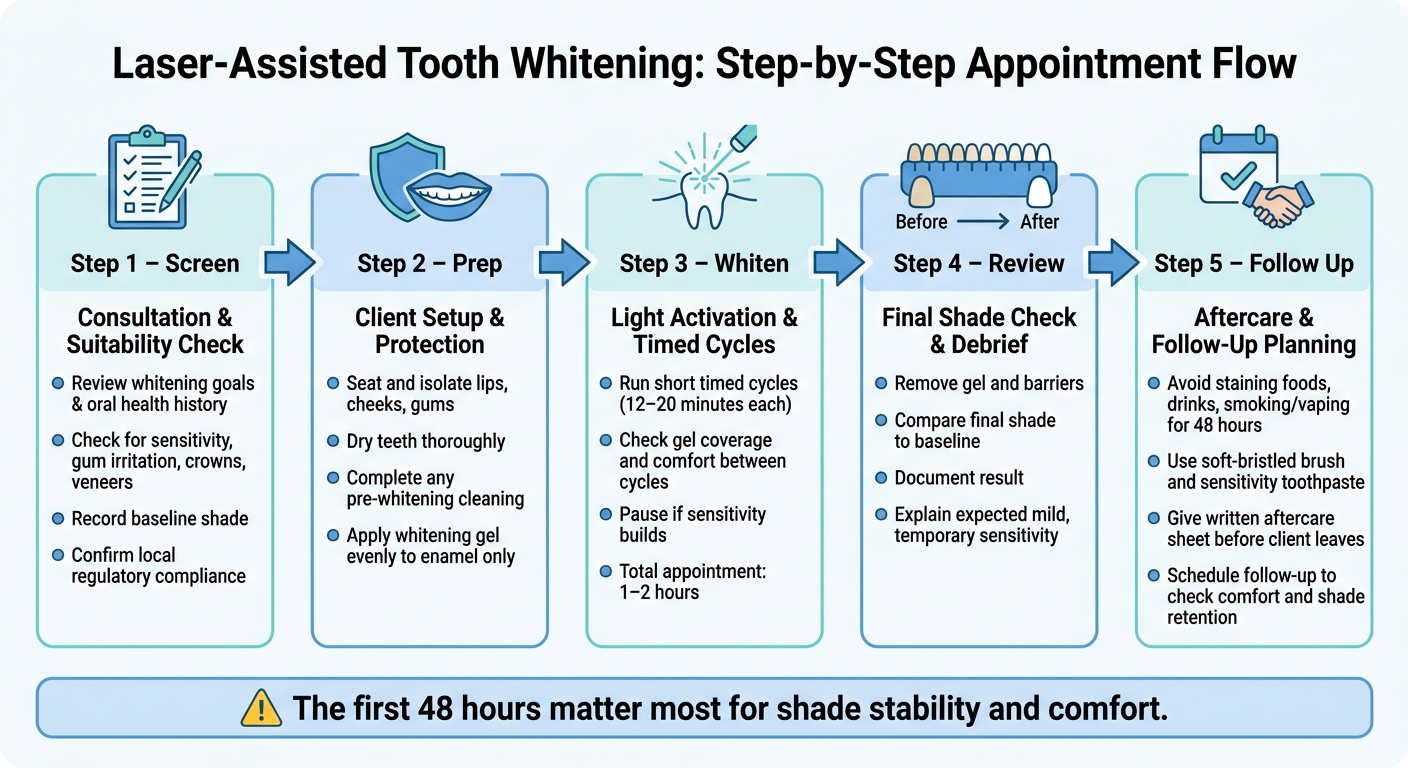
Laser Tooth Whitening Appointment: Step-by-Step Process
How is Laser Teeth Whitening Done - Teeth whitening in Toronto
sbb-itb-accb75b
Step 1: Consultation, suitability check, and baseline shade record
Start with the consultation before any gel or equipment is used. Once you've confirmed the client is a good fit, you can move into setup and protection.
Review whitening goals and oral health history
Ask the client what they want to achieve, then go over their oral health history. Check for recent dental work, tooth sensitivity, gum irritation, and restorations such as crowns or veneers. Those details help you decide if the treatment is suitable and help set clear expectations.
Before you go ahead, confirm the treatment aligns with your local regulations and insurance coverage.
Record the starting shade
If the client is suitable, record the starting shade before treatment begins. This gives you a baseline to compare against after the session. It also sets up the post-treatment shade check.
Adjust the plan when needed
Delay or decline treatment if sensitivity, gum irritation, or restorations make the protocol unsuitable. Treatments should always be used in line with the rules that apply in your area.
If the client is cleared to proceed, move to setup, protection, and gel application.
Step 2: Client setup, protection, and gel application
Get the client into position and prep the mouth so the gel stays where it should. The goal is simple: keep the gel on enamel and get the teeth ready for activation.
Seat, isolate, and protect the treatment area
Seat the client comfortably, then isolate the treatment area so the lips, gums, and cheeks stay clear of the whitening gel. Dry the teeth well before application. That helps the gel sit evenly on the enamel instead of sliding around.
Complete any pre-whitening cleaning step first
Finish any cleaning step before you apply the gel. Plaque or debris can get in the way and lead to uneven coverage. Follow the system manual for the exact prep sequence.
Apply the whitening gel across visible teeth
Apply the whitening gel in an even layer across the visible treatment teeth. Keep it on the enamel and away from soft tissue. Once the gel is in place evenly, move into the timed light cycles.
Step 3: Light activation, treatment timing, and finish
Once the gel is on, place the laser over the treatment teeth and start the timed cycles.
Run timed whitening cycles
Use short cycles, not one long pass. Between cycles, check the gel coverage and ask about comfort. If sensitivity starts to build, pause the treatment.
Remove products and compare the final shade
After the last cycle, remove the gel and barriers. Then compare the final shade with the baseline shade using a teeth whitening shade guide recorded in Step 1, and document the result.
Explain expected short-term effects before the client leaves
Before the client leaves, explain the short-term effects they may notice, especially mild, temporary sensitivity. Walk them through what may happen in the next few hours and when they should contact the provider if discomfort doesn't settle. Then move into home-care instructions and follow-up planning.
Step 4: Aftercare, follow-up, and service planning
Aftercare instructions for the first 24 to 48 hours
After the final shade check, aftercare helps protect the result and keep sensitivity down. The first 48 hours matter most for shade stability and comfort.
Ask clients to avoid the following during that window:
- Food and drink: Dark-staining foods and drinks, including coffee, tea, red wine, berries, and dark sauces, for 48 hours
- Smoking/vaping: Avoid both for 48 hours
- Sensitivity: Use a soft-bristled brush, sensitivity toothpaste, and stay away from very hot or cold items until sensitivity settles
Give clients a written aftercare sheet before they leave. That small step makes a big difference. People forget details once they walk out the door, especially right after a treatment.
Plan the follow-up and future maintenance
Once the aftercare window is covered, confirm when the client should come back for a check-in. A follow-up visit helps confirm comfort, review retention, and set the timing for touch-ups.
It also gives you a natural moment to talk about future maintenance. That timing depends on the client’s whitening goals and lifestyle habits, such as diet and smoking. Someone who drinks coffee every day may need a different touch-up schedule than someone who doesn’t.
Conclusion: From consult to aftercare
A well-run laser-assisted whitening appointment follows a clear sequence: suitability check, baseline shade record, protective setup, timed gel and light cycles, final shade review, and structured aftercare guidance.
Each step leads into the next. And the follow-up is what turns a one-time appointment into an ongoing client relationship. A structured follow-up helps protect results and manage sensitivity after treatment.
FAQs
Am I a good candidate for laser-assisted tooth whitening?
Laser-assisted tooth whitening is usually safe and non-invasive when a trained technician performs it. If you want a professional cosmetic whitening treatment, it may be a good fit.
If your teeth are sensitive, non-peroxide options with plant-based or natural ingredients may help lower irritation. At your first consultation, talk through your dental history and any concerns so you can confirm the treatment makes sense for you.
Will my crowns or veneers change colour too?
No. Laser-assisted whitening works on natural tooth enamel. It won’t change the colour of crowns, veneers, or other dental restorations.
If you have these in your smile, they’ll stay the same shade while your natural teeth get brighter. That can leave you with a noticeable colour difference.
How long will my whitening results last?
Whitening results can differ from person to person. Your diet, daily habits, and oral hygiene all play a part in how long your smile stays brighter.
How long the results last comes down to maintenance. The better you look after your teeth after treatment, the longer the effects tend to stick around.
To help your brighter smile last longer, follow the aftercare advice from your technician. Consistent care makes a big difference.