

Sterilization Steps for Teeth Whitening Tools
If a whitening tool isn’t cleaned first, sterilization can fail. That’s the main point.
When I look at safe teeth whitening reprocessing, I keep it simple: sort items by contact risk, keep dirty and clean items apart, clean tools right after use, sterilize heat-safe semi-critical items, disinfect non-critical items, and log every cycle. Weekly spore testing, dry packs, and closed storage also matter.
Here’s the full process in plain language:
- Use PPE and clean hands before handling used tools
- Separate dirty and clean zones so items never cross back
- Throw out single-use items after each client
- Clean reusable tools first, because debris can block sterilization
- Use ultrasonic cleaning for hinged or hard-to-clean tools when available
- Disinfect surfaces and equipment like lamps, cords, and chair controls
- Dry and inspect tools before packaging
- Run the right cycle for the tool material and packaging type
- Check indicators on every load
- Do biological spore tests at least weekly
- Store packs dry and closed
- Record every cycle with date, load details, and test results
A few facts stand out:
- Wrapped loads often use 134 °C for 3 to 7 minutes in a prevacuum steam unit
- Gravity steam cycles often run at 121 °C for 15 to 30 minutes
- Dry heat can take 60 to 120 minutes at 160 to 170 °C
- Spore testing should be done at least once a week
The article also draws a clear line between item types:
| Item type | Usual contact level | What I would do |
|---|---|---|
| Silicone cheek retractors, reusable applicators, mouth mirrors | Semi-critical | Heat sterilize if the item allows it |
| Safety goggles, light shields, lamp handles, bib clips | Non-critical | Clean and disinfect after each client |
| Bibs, gauze, cotton rolls, gloves | Single-use | Discard after each client |
If I had to sum up the whole workflow in one sentence, it would be this: clean first, sterilize the right items, monitor every load, and keep records every time.
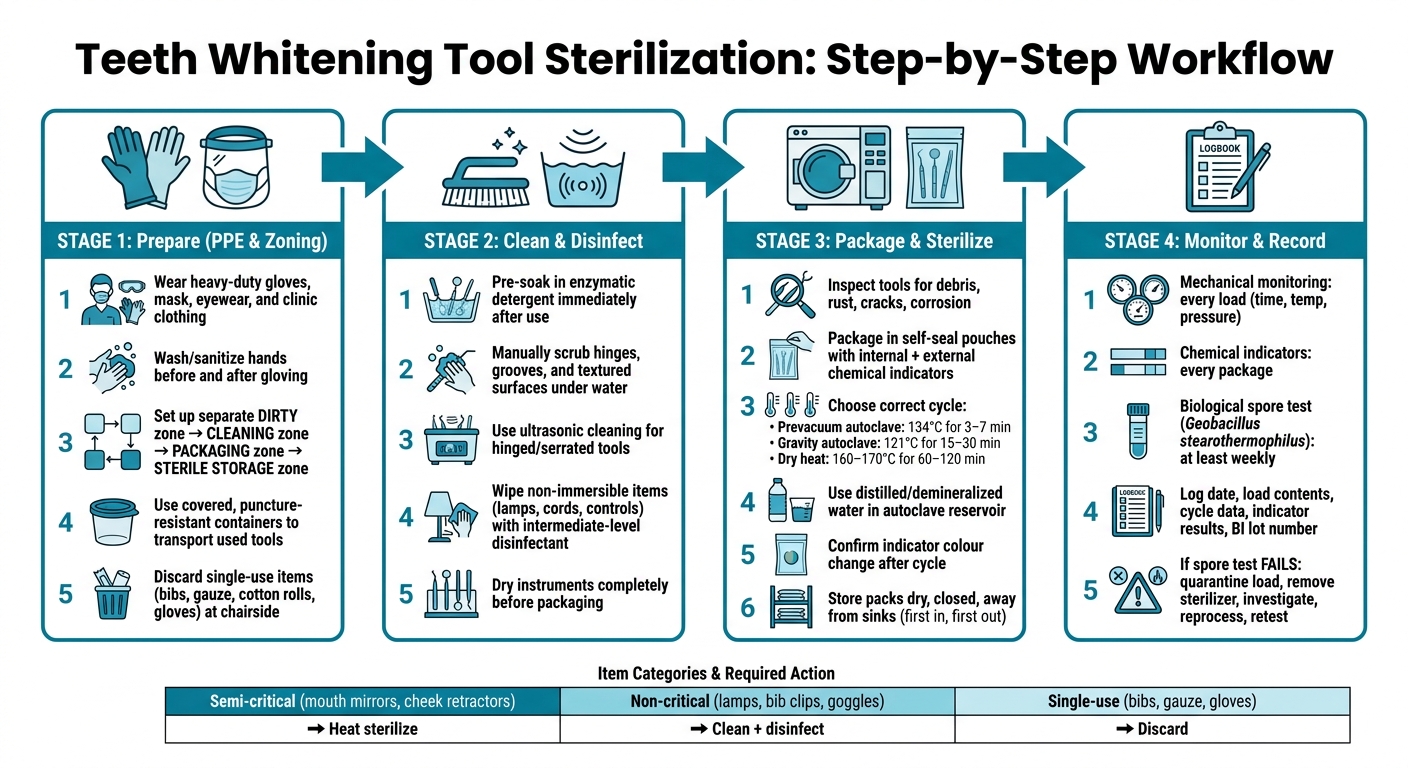
Teeth Whitening Tool Sterilization: Step-by-Step Workflow
Sterilizing Dental Instruments (Step by Step Guide)
sbb-itb-accb75b
Step 1: Prepare staff, PPE, and a one-way workflow
Now it’s time to put the workflow into action. Start with PPE, then keep dirty items and clean items apart at every stage. Once that setup is in place, move used tools into the dirty stream without letting them cross back into clean areas.
Use proper PPE and hand hygiene when handling instruments
Anyone handling used tools needs to wear heavy-duty gloves, protective eyewear, a mask, and clinic-only clothing. Hands should be washed or sanitised before putting gloves on and again after taking them off. Gloves need to be changed between clients and any time you switch from a dirty task to a clean one.
Masks must be changed between clients and any time they become damp, soiled, or damaged. Protective eyewear has to be cleaned and disinfected between clients, or at once if it becomes visibly contaminated.
Separate dirty, clean, sterilization, and storage zones
Even in a small salon room or mobile setup, give each stage its own spot. That means a receiving area for used tools, a cleaning area, an inspection and packaging area, and a closed cabinet or drawer for sterile packs.
Don’t carry loose instruments by hand from the treatment chair to the processing area. Use a covered, puncture-resistant container so used tools can be moved safely. If cleaning can’t happen right away, keep instruments moist in a covered holding container so organic debris doesn’t dry onto them.
For mobile setups, keep it simple:
- One clearly labelled dirty container
- One clearly labelled clean container
Sort disposables from reusable tools before processing
Sort disposable items at chairside before anything leaves the treatment area. Bibs, cotton rolls, gauze, and single-use gloves should go straight into the waste bin as soon as the service is finished.
The table below shows which whitening items are single-use and which can be reused, along with the level of reprocessing each one needs:
| Item Type | Contact Category | Required Level |
|---|---|---|
| Mouth mirrors, cheek retractors | Semi-critical | Heat sterilization preferred; high-level disinfection minimum |
| Whitening lamps, cords, bib clips | Non-critical | Intermediate or low-level disinfection |
| Bibs, gauze, cotton rolls, gloves | Single-use disposable | Discard after each client |
Step 2: Clean and disinfect tools before sterilization
Once your dirty and clean zones are set up, move reusable tools into cleaning right after use. If an instrument still has saliva, biofilm, or dried debris on it, sterilization can fail. That’s why the first job is simple: soak first, then scrub.
Pre-soak and manually clean reusable whitening instruments
Place reusable whitening instruments in an enzymatic detergent solution as soon as you’re done using them. This helps stop debris from drying onto the surface, which makes cleaning much harder.
After soaking, scrub each instrument with a long-handled brush and detergent while wearing heavy-duty utility gloves, a mask, and eye protection. Give extra attention to hinges, grooves, and textured surfaces, since those spots tend to hold onto saliva and biofilm. Scrub under water to cut down on splashing, then rinse well with clean water.
Use ultrasonic cleaning for hinged or textured tools.
Use ultrasonic or automated cleaning when available
Ultrasonic cleaning works well for tools with hinges, serrations, or spots that are hard to reach because cavitation lifts debris from those tight areas.
| Method | Best for | Why it helps |
|---|---|---|
| Manual Cleaning | Simple, smooth instruments | Lower equipment cost; can be done right away |
| Ultrasonic Cleaning | Hinged tools, serrated surfaces | Gets into tiny crevices; cuts down on hand contact |
| Automated Washer | High-volume clinics | Delivers steady results; cuts down on hand contact |
Always follow the manufacturer’s instructions for solution type, water quality, and cycle length. In ultrasonic units, use distilled or demineralized water to help prevent mineral buildup and corrosion over time.
Disinfect surfaces, lamps, cords, and non-immersible equipment
Some items can’t go into a soak or an ultrasonic cleaner. Wipe whitening lamps, cords, control panels, and chairs with a compatible intermediate-level disinfectant. Keep the surface visibly wet for the full contact time listed on the label. You can use disinfecting wipes or a surface disinfectant that matches the equipment.
Before moving to the next step, dry instruments completely.
Step 3: Package, sterilize, and store tools correctly
Inspect, dry, and package instruments before the cycle
After cleaning and disinfection, reusable tools should be inspected, packaged, sterilized, and stored without delay. Once an instrument is clean, dry it fully and inspect it under good lighting. This is the step that keeps the instrument protected until it’s used again.
Look closely for debris, rust, cracks, corrosion, loose hinges, and worn tips.
Wet packs are unsterile because moisture can carry contamination through packaging.
Place instruments in self-seal sterilization pouches (paper/plastic) or instrument cassettes. Use both external and internal chemical indicators to confirm steam penetration. Don’t overfill pouches or pack instruments too tightly. If steam can’t reach every surface, the cycle can fail.
Once the tools are packaged, choose the cycle that fits the instrument material.
Run the correct sterilization cycle for each material
The sterilization cycle needs to match the instrument material. Prevacuum (Type B) autoclaves remove air before steam enters, which makes them better for wrapped instruments. Compact tabletop units usually run at 134 °C for 3 to 7 minutes, while gravity displacement units use longer cycles at 121 °C for 15 to 30 minutes.
Use distilled or demineralized water in the autoclave reservoir every time. Tap water can leave mineral buildup, which may corrode tools and damage the chamber over time. Hinged tools should be lubricated with a steam-permeable lubricant before the cycle.
| Sterilization Method | Typical Use in Whitening Practice | Compatible Materials | Key Limitations |
|---|---|---|---|
| Steam Autoclave (Prevacuum/Type B) | Standard for wrapped kits and most reusable tools | Stainless steel, heat-safe plastics, hollow instruments | Can damage some delicate electronics or low-grade plastics |
| Steam Autoclave (Gravity/Type N) | Solid, unwrapped instruments | Solid stainless steel tools | Less effective for wrapped or hollow items; longer cycle times |
| Dry Heat | Moisture-sensitive metal tools | Metal instruments that may rust in steam | Requires 160–170 °C and 60–120 minutes per cycle |
| Chemical Vapour and UV sterilization | Heat-sensitive items | Specific plastics and compatible alloys | Requires toxic chemicals and specialised ventilation |
Cool, monitor, and store sterile packs without contamination
After the cycle and indicator checks, move sterile packs straight to storage. Don’t open the autoclave door before the drying phase is fully finished. When the cycle ends, confirm that the external indicator has changed colour and check the internal strip before storing the pack.
Biological monitoring checks whether the sterilization process is working as it should. Spore tests using Geobacillus stearothermophilus should be done at least weekly. Keep a dedicated logbook with the date, load contents, and indicator results. During an inspection, this is often one of the first records requested.
Storage matters more than many people think. A sterile pack stays sterile only if the packaging remains intact, dry, and unopened. Store packs in a clean, dry, closed cabinet or drawer, away from sinks and splash zones. Use first in, first out rotation so older packs are used first. If a pouch is torn, wet, crushed, or opened, the tools need to be reprocessed.
Step 4: Keep records, test equipment, and maintain consistency
Log every cycle and respond to failed tests
Once tools are sterilized and stored, document the cycle and check the unit before it’s used again.
Record every cycle: date, time, load contents, cycle data, and indicator results. For biological indicator tests, also record the sterilizer ID, cycle number, BI lot number, and final result.
Keep the logbook at the sterilization station so staff can review it fast during audits.
Monitor each load like this:
| Monitoring Type | Frequency | What to Record |
|---|---|---|
| Mechanical (time, temp, pressure) | Every load | Verify and file the printed or digital cycle record |
| Chemical (external + internal indicators) | Every package | Confirm colour change before storing or using |
| Biological (spore test) | Weekly minimum | Date, sterilizer ID, cycle number, BI lot number, and result |
| Maintenance/Service | As needed | Repairs, relocations, and post-service biological indicator result |
If a biological indicator fails, act right away: quarantine the load, remove the sterilizer from service, investigate the cause, reprocess the instruments, and retest before reuse. A passing biological indicator confirms the sterilizer reached conditions capable of killing microorganisms.
Schedule routine maintenance and staff training
Check the reservoir at each service and refill it with distilled or demineralized water before the next cycle. Inspect chamber seals on a regular basis, and run a biological indicator test after any repair, relocation, or power interruption.
Staff consistency matters just as much as equipment care. Post a one-page sterilization checklist at the station and train staff on it during onboarding and refresher sessions.
That simple habit helps keep the process steady from one shift to the next.
Conclusion: Key sterilization steps to follow every day
Reliable sterilization comes down to doing the same steps the right way, every day. Classify tools correctly, keep dirty and clean zones physically separate, clean instruments well before any sterilization cycle, use the right autoclave settings for each material, monitor every load with mechanical and chemical indicators, perform biological indicator tests on schedule, and document everything.
These aren’t one-time tasks. They’re daily habits that help protect clients and build trust.
FAQs
Why isn’t cleaning enough?
Cleaning gets rid of what you can see. But it doesn't remove the microbial pathogens left behind on tools. And organic matter, like blood or tissue, can act like a barrier that protects microorganisms during sterilization.
If residue or biofilm stays on the surface, sterilization may not work as intended. In that case, tools can still harbour infectious pathogens. That's why safety and hygiene depend on a multi-step process: cleaning, disinfecting, and sterilizing.
Which whitening tools must be heat sterilized?
Critical items that penetrate soft tissue or bone must always be heat sterilized.
Semicritical items that contact mucous membranes or non-intact skin should also be heat sterilized if they can tolerate heat.
If a semicritical item is heat-sensitive, it needs at least high-level disinfection.
Dental handpieces and their attachments must always be heat sterilized between patients.
What should I do if a spore test fails?
If a spore test fails, immediately take the sterilizer out of service.
Do not use instruments from the failed load. Also quarantine all instruments processed since the last successful spore test.
Then look into what went wrong. Check for operator error or a mechanical problem, and confirm the cycle’s physical parameters.
Contact your local public health authority for guidance.
Once the issue is fixed or the unit is repaired, run consecutive successful spore tests before putting the sterilizer back into service.