

Teeth Whitening Disposal Guide for Clinics
If I run a whitening clinic in Canada, I need one simple rule: sort waste at the point of use, store each stream apart, and keep records for every step.
That covers the full job. In most clinics, I’m dealing with 3 waste streams: chemical waste, general clinical waste, and biomedical waste when blood is present. I also need to check SDS instructions, follow provincial and municipal rules, use the right containers, train staff, and keep pickup and training records on file.
Here’s the article in plain terms:
- Chemical waste includes leftover peroxide gel and chairside kits, product residue, and some cleaners. I should never pour unused gel down a drain.
- General waste usually includes dry PPE, barriers, trays, and packaging, if local rules allow it.
- Biomedical waste applies when items have visible blood contamination.
- Sharps like needles, lancets, and broken glass need an approved sharps container right away.
- Waste should be labelled, separated, secured, and moved out on schedule.
- Staff should learn the process before working alone, with refreshers after incidents, product changes, or rule changes.
- I should confirm disposal steps with suppliers, waste haulers, my insurer, and local authorities.
- My clinic should keep a short written policy plus records such as SDS files, training logs, insurance notes, and pickup receipts.
A few details stand out. The supplier training portal mentioned in the article stays open for 90 days after purchase, so I’d download guides right away. And if I compare disposal services, I should get written quotes in CAD and check pickup limits, contract terms, and receipt or manifest support.
This guide is less about theory and more about keeping the clinic tidy, safe, and ready if someone asks to see how waste is handled.
Dental Waste Disposal Training | Sharps, Hazardous & Pharma Waste
sbb-itb-accb75b
How to classify whitening waste before it goes in the bin
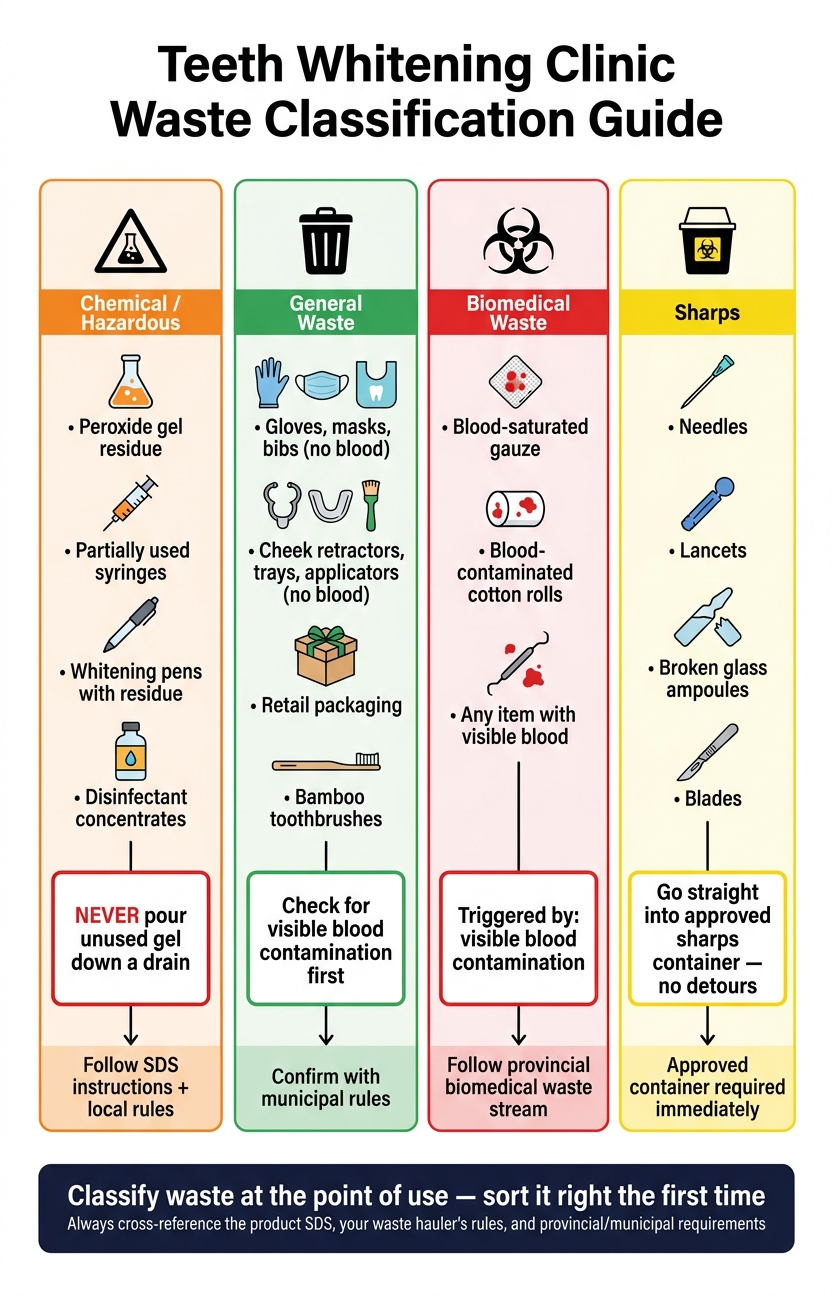
Teeth Whitening Clinic Waste Classification Guide: 3 Streams at a Glance
Classify waste where it's used so it goes into the right stream the first time.
Use the product SDS, your waste hauler’s rules, and provincial or municipal requirements to sort each item. That up-front step helps you avoid mix-ups later, especially during storage and pickup.
Whitening gels, syringes, and chemical cleaners
Peroxide gels, product residue left in syringes, disinfectant concentrates, and other chemical leftovers do not belong in general waste. They need to be handled based on the SDS and local rules. And one point matters a lot: never pour unused product down a drain.
Getting the class right at this stage helps prevent handling mistakes later on.
Patient-contact disposables and PPE
Dry patient-contact disposables and PPE usually go into general waste. The main thing to check is visible blood contamination.
If there’s visible blood on the item, it moves into biomedical waste.
Sharps and items that need stricter handling
Needles, lancets, blades, and broken glass ampoules should go straight into an approved sharps container. No detours, no temporary set-aside.
Waste classification table for staff reference
| Item | Waste Category | Main Risk | Disposal Stream |
|---|---|---|---|
| Peroxide gel residue / partially used syringes | Chemical / Hazardous | Chemical burn, contamination | SDS-guided hazardous waste handling |
| Whitening pens with residue | Chemical or general, per SDS | Residual product | Follow SDS and local rules |
| Disinfectant concentrates | Chemical / Hazardous | Corrosive, reactive | SDS-guided hazardous waste handling |
| Gloves, masks, bibs (not blood-contaminated) | General Waste | Minimal | General waste stream |
| Cheek retractors, trays, applicators (used, no blood) | General Waste | Minimal | General waste stream |
| Blood-saturated gauze or cotton rolls | Biomedical | Infectious | Provincial biomedical waste stream |
| Needles, lancets, broken glass ampoules | Sharps | Puncture injury | Approved sharps container |
| Retail packaging and bamboo toothbrushes | Recyclable or general, per municipal rules | Minimal | Municipal recycling or general waste |
Once items are sorted, the next step is secure storage between treatments and pickup.
How to store waste safely between treatments and pickup
After you sort waste into the right stream, the next step is simple: keep it separate, labelled, and ready for pickup. Good storage habits help prevent mix-ups and make day-to-day handling much easier. Once items are classified, storage controls keep each waste stream apart until pickup.
Container standards and labelling requirements
Use containers approved for each waste stream, and follow the SDS plus the manufacturer’s instructions for storage and handling. This isn’t the place to guess or improvise.
Labels should clearly show what waste stream the container belongs to. That way, staff can keep materials separate and handle them the right way under local rules.
Storage conditions, security, and waste segregation
Store waste based on the SDS, including any instructions for temperature or light sensitivity. Keep it in a secure back room and out of patient access.
Chemical waste should stay separate from general waste. Mixing streams can create problems fast, both for safety and for pickup.
If you’re planning to offer a new treatment or bring in a new product, check your storage plan with your insurer first. It’s a small step that can save a lot of hassle later.
When to schedule pickup or move waste out of storage
Don’t wait until containers are full. Schedule pickup or drop-off based on local holding-time limits and your hauler’s rules.
Your storage plan should also fit the way waste moves through treatment rooms each day. If waste builds up faster on some days than others, your pickup schedule should reflect that.
Room setup, storage areas, and daily cleanup workflow
Once waste is sorted and stored the right way, the room itself needs to support that system during treatment. A good setup makes waste separation feel almost automatic, with PPE and cleanup supplies close by.
Room layout and bin placement
Place clearly labelled containers right where items are used so staff can throw things out right away. Each container should sit where that part of the treatment happens. If your clinic uses a temporary storage area, keep it separate from the treatment room and keep each waste stream physically apart.
Before you change the room layout, confirm the plan with your insurer and check local provincial or municipal requirements.
The goal is simple: make each step fast, easy to see, and easy to repeat.
Staff process from pre-treatment to end of day
Before the first client arrives, check that all containers are labelled and that PPE and cleanup supplies are stocked and within reach. During treatment, put each item into the correct waste stream right away. Don't leave sorting for later, because that's where mistakes creep in.
After each client, follow the cleanup steps in the supplier manual. At the end of the day, move collected waste to the designated storage area and keep the waste streams separate.
Handling spills, drips, and accidental mixing
If there's a spill or a mix-up, follow the clinic's spill-response procedure and the supplier training guide. If the same mistake keeps happening, the fix isn't just cleaning it up again. Go back to training and deal with the cause.
These steps should be built into the clinic's standard routine so everyone follows the same process every day.
Room setup and staff responsibility tables
| Room Element | Minimum Compliance | Best Practice |
|---|---|---|
| Waste containers | Clearly labelled and separated by stream | Placed at the point of use for quick disposal |
| PPE and cleaning supplies | Available to staff when needed | Stored close to the treatment station for easy access |
| Temporary storage area | Separate from the treatment room | Dedicated to collected waste until it is moved out |
| Written cleanup steps | Available to staff | Saved from supplier manuals and reviewed regularly |
| Task | Owner / Manager | Lead Technician | Treatment Staff |
|---|---|---|---|
| Confirm insurance and local compliance before changing the room layout | ✓ | ✓ | |
| Keep waste streams separated and containers labelled | ✓ | ✓ | ✓ |
| Follow the standard cleanup workflow from supplier materials | ✓ | ✓ | |
| Move collected waste to the designated storage area at day's end | ✓ | ✓ | ✓ |
| Revisit training if a mistake repeats | ✓ | ✓ | ✓ |
How to train staff and standardize daily disposal steps
Once containers are in place, staff training keeps disposal consistent. If one person sorts waste one way and someone else does it another way, the whole system can fall apart. Training turns the room setup above into a repeatable part of the day.
What staff need to know before handling waste
Before handling waste, staff need to know the same categories and container labels used in the treatment room. That includes reading product labels and Safety Data Sheets (SDS) for the specific whitening gels in use, knowing where each waste stream goes, and wearing PPE the right way. Staff are responsible for following product instructions and local disposal rules.
How to build a short onboarding and refresher process
Keep onboarding short and clear. Review the clinic disposal policy and each product SDS, walk through the room, shadow one treatment with a checklist, and sign off on the checklist. After shadowing is done, have the staff member sign a training confirmation so you have a clear record that they understood the process before working on their own.
Training should also be reviewed after incidents, supplier changes, or regulatory updates. Smile360 Teeth Whitening Canada provides an online training portal that stays open for 90 days after purchase, along with a downloadable Training Guide. Download the guide right away so it stays on file after portal access ends.
Staff training checklist table
| Training Item | Required For | Verification Method | Review Frequency |
|---|---|---|---|
| SDS and label reading | All clinical staff | Signed training record | Annually or upon product change |
| Waste stream identification | All staff | Walkthrough plus observed treatment | Every 6 months |
| PPE protocols | All staff | Practical demonstration | Annually |
| Spill response and cleanup | All staff | Mock drill or checklist | After any incident or annually |
| Local regulatory compliance | Clinic manager | Policy review log | Annually |
Next, match these steps to supplier instructions and local pickup rules.
Supplier support, approved pickup, and local disposal logistics
What to ask suppliers about whitening products
Once your waste is classified and stored, the next step is simple: make sure every product you buy fits the disposal route your clinic already uses.
Before you place an order, ask for a current Safety Data Sheet (SDS) for each whitening gel and chemical cleaner you plan to use. You should also ask for written disposal instructions for expired or unused gel, storage temperature guidance in Celsius, and written confirmation that the product works with your approved waste containers. It’s also smart to confirm, in writing, whether any ingredient could trigger hazardous handling under provincial rules.
Smile360 Teeth Whitening Canada also provides product and training materials for clinic handling and disposal procedures.
What to confirm with waste haulers and local programs
Once the product instructions are clear, line them up with a hauler or municipal program that accepts that same waste stream. This matters because not every waste carrier is approved for every type of waste.
Before signing anything, confirm that the hauler has a licence or approval for the exact waste stream your clinic produces. Ask what packaging and labelling they require, how often pickups happen, and whether they provide a pickup manifest or collection receipt for each collection. Keep those records on file.
You should also check your provincial environmental ministry’s website, your municipal waste management office, and any local bylaws to see what options are approved in your area. Some municipalities accept small clinic volumes through existing commercial programs. Others require a private licensed carrier.
How to compare local pickup and drop-off options
When comparing pickup and drop-off choices, get written quotes in CAD. Then look past the sticker price.
Confirm:
- Minimum pickup volumes
- Emergency collection availability
- Container requirements
- Total contract terms
If your municipality offers a commercial program for small clinic volumes, compare those rules and limits against private licensed carrier pickup options.
Clinic, supplier, and waste carrier responsibilities table
| Responsibility Area | Clinic | Supplier | Waste Carrier |
|---|---|---|---|
| Documentation | Maintain on-site SDS files, waste logs, training records, and pickup records | Provide current SDS, disposal guides, and product instructions | Provide pickup manifests, collection receipts, and destruction certificates |
| Storage | Segregate waste by stream and monitor storage conditions | Provide storage temperature guidance in Celsius and container compatibility information | Ensure safe transport of collected waste |
| Compliance | Follow provincial and municipal disposal laws | Ensure products meet national standards | Maintain licence or approval for accepted waste types |
| Training | Train staff on spill response and disposal steps | Provide product-specific handling and disposal training materials | Provide guidance on bin labelling and packing requirements |
How to write a basic clinic disposal policy and keep records
Once your disposal steps are on paper, turn them into a short policy your staff can use every day. Keep it plain, direct, and easy to check during a busy shift.
Core sections to include in a whitening waste policy
Build the policy using supplier manuals and training guides, then save local copies as soon as they’re issued. That matters because portal access can end, and you don’t want key instructions to vanish with it.
The policy should also say, in plain terms, that the purchaser must follow national, provincial, local, and industry-body rules for product use and disposal.
Records to keep for routine operations and inspections
Keep one compliance file so training records, marketing and compliance approvals, and inspection documents are easy to find. If an inspector asks for proof, you don’t want staff digging through inboxes or old folders.
| Record Type | What to Document | Retention Note |
|---|---|---|
| Staff Training Guides | Copies of supplier guides and staff completion records from the training portal | Store locally after portal access ends |
| Insurance Correspondence | Written consultation with your insurer before offering new treatments or products like a professional whitening business kit | Retain as long as the service is offered |
| Compliance Documentation | Local and provincial disposal requirements and updates from governing bodies | Update whenever requirements change |
| Product Manuals | Digital copies of equipment and gel manuals | Keep permanently for the life of the equipment |
Conclusion: Disposal basics every whitening clinic should follow
Keep the policy short, backed by records, and update it whenever rules change.
FAQs
Do all whitening clinics in Canada need biomedical waste pickup?
Not necessarily. Whether you need biomedical waste pickup depends on the rules in your province or municipality.
Teeth whitening clinics often use disposable items like gloves, masks, and bibs. Because of that, it’s smart to check with your local public health authority or inspector to see if your waste can go out with regular commercial garbage or if you need a biomedical waste service.
How long can I store whitening waste before pickup?
The search results don’t say how long whitening waste can stay on-site before a licensed pickup.
For compliance, check with your local provincial or municipal waste management authority to confirm the storage limits that apply to your facility’s waste classification.
What records should I keep for inspections?
Keep MSDS and SOP manuals up to date, along with records for your formal infection control programme. That includes equipment and surface disinfection protocols, plus personal safety practices.
It also helps to track product use and disposable supplies for each treatment, such as whitening gel, cheek retractors, bibs, masks, gloves, and aftercare kits.
Why does this matter? Because clear records make day-to-day operations easier and help support compliance with local Canadian public health requirements.